

이지은님의 블로그
250210 - Java Spring 일정관리 앱 구현과 트러블 슈팅: 일정과 유저 CRUD, Validation, PasswordEncoder, 공통 예외 및 공통 응답 처리 본문
250210 - Java Spring 일정관리 앱 구현과 트러블 슈팅: 일정과 유저 CRUD, Validation, PasswordEncoder, 공통 예외 및 공통 응답 처리
queenriwon3 2025. 2. 10. 23:49▷ 오늘 배운 것
이때까지 작성했던 일정 관리 앱을 업그레이드 한 과정에 대해 블로그를 작성해보겠다.
<<목차>>
0. API 명세서 작성하기
1. JPA를 이용한 Entity작성
2. DTO 만들기
3. User 등록(회원가입) 구현 (Create)
4. User 전체 조회 구현 (Read)
5. User 단일 조회 구현 (Read)
6. User 이름 수정 구현 (Update)
7. User 비밀번호 수정기능 (Update)
8. User 삭제 기능(Delete)
9. 일정 작성 기능(Post)
10. 일정 전체 조회 기능(Read)
11. 단일 일정 조회 기능 (Read)
12. 일정 제목 내용 수정 (Update)
13. 일정 삭제 기능 구현 (Delete)
14. 공통 예외 처리
15. Request에 대한 Validation지정하기
16. PasswordEncoder
17. @NotBlack와 @NotNull의 차이(트러블 슈팅)
0. API 명세서 작성하기
프로젝트를 제대로 작성하기 전에 api를 어떻게 요청하고 응답할 것인지 설계해 보았다.
https://flaxen-swan-41e.notion.site/Lv-0-192b649ebbbd80eda2b9ee81449163ec
Lv. 0 기획단계 | Notion
Made with Notion, the all-in-one connected workspace with publishing capabilities.
flaxen-swan-41e.notion.site
(자세한 명세서 내용 - 필수 API 명세서)

과제 요구사항에 따라(~lv.2) 일정과 조회 각각 등록, 전체조회, 단건조회, 수정, 삭제에 대한 api 명세서를 작성했으며, 예상 상태코드, 출력될 수 있는 에러코드를 표의 형태로 작성해보았다.
swagger를 바로 적용하여 문서로 작성해 보았지만 추후 로그인 filter에 의해 막힐 예정으로 보인다. 이 점에 대해서 해결방법을 찾아봐야겠다.
위 처럼 명세서를 작성하니 어떤 데이터베이스 테이블이 필요한지, 각 칼럼의 속성을 파악하기 쉬워 구조를 빠르게 파악할 수 있었던 것 같다.
1. JPA를 이용한 Entity작성
기본설정(.properties)
spring.datasource.url=jdbc:mysql://localhost:3306/schedule
spring.datasource.username=/* 사용자 이름 */
spring.datasource.password=/* 비밀번호 */
spring.datasource.driver-class-name=com.mysql.cj.jdbc.Driver


spring.jpa.hibernate.ddl-auto=create  # 실행시 기존 테이블을 삭제하지 않고 새로 생성

spring.jpa.properties.hibernate.show_sql=true  # 쿼리문 출력
spring.jpa.properties.hibernate.format_sql=true  # 쿼리문 자동 정렬
spring.jpa.properties.hibernate.use_sql_comments=true  # 쿼리문 자동 주석 생성

spring.jpa.properties.hibernate.dialect=org.hibernate.dialect.MySQLDialect  # MySQL에 해당하는 방언사용
mysql을 사용하고, jpa를 이용하여 데이터 베이스에 접근하기 위해 기본 설정을 작성해주었다.
spring.jpa.hibernate.ddl-auto : 애플리케이션 실행 시 데이터베이스 테이블을 생성하는 옵션
| 값 | 의미 |
| none | Hibernate가 테이블을 자동으로 생성하거나 수정하지 않음 |
| create | 기존 테이블을 삭제하고 새로 생성 |
| create-drop | create와 동일하지만, 애플리케이션 종료 시 테이블 삭제 |
| update | 기존 테이블을 유지하며 변경된 부분만 업데이트 |
| validate | 테이블이 현재 엔티티와 일치하는지 검증 (수정 X) |
작성일, 수정일을 위한 BaseEntity
@Getter
@MappedSuperclass
@EntityListeners(AuditingEntityListener.class)
public abstract class BaseEntity {

    @CreatedDate
    @Column(updatable = false)
    private LocalDateTime createdAt;

    @LastModifiedDate
    private LocalDateTime modifiedAt;

}
작성일과 수정일을 생성해주기 위해 BaseEntity를 미리 작성해주었다.
Schedules 테이블과 매핑할 entity
@Entity
@Getter
@Table(name = "schedules")
@NoArgsConstructor
public class Schedules extends BaseEntity{

    @Id
    @GeneratedValue(strategy = GenerationType.IDENTITY)
    private Long id;

    @Setter
    @ManyToOne
    @JoinColumn(name = "user_id")
    private Users users;

    @Column(nullable = false)
    private String todoTitle;

    @Column(nullable = false, columnDefinition = "longtext")
    private String todoContents;
}
Schedules 테이블을 생성할 형식인 entity를 작성해준다. 여기서 user_id는 외래키가 되어 users테이블과 연관관계를 맺을 것이다. 이를 통해 일정값을통해 일정을 작성한 유저의 정보를 확인할 수 있다.
Users 테이블과 매핑할 entity
@Entity
@Getter
@NoArgsConstructor
@Table(name = "users")
public class Users extends BaseEntity{

    @Id
    @GeneratedValue(strategy = GenerationType.IDENTITY)
    private Long id;

    @Column(nullable = false, unique = true)
    private String name;

    @Column(nullable = false)
    private String email;

    @Column(nullable = false)
    private String password;

}
그리고 users테이블을 정의할 users 엔티티를 구현해준다.

실행하면 자동으로 SQL문을 작성해준다

실행후에 테이블이 원하는 대로 잘 작성되는 것을 볼 수 있었다.

작성된 테이블의 속성과 연관관계의 다이어그램을 살펴보면 다음과 같다.
2. DTO 만들기
1) schedule DTO만들기
Api 명세서를 작성하면서 기본 일정작성(POST)의 request와 response의 예시의 경우 다음과 같이 설계했다.

이 설계 내용에 따라 Post에 사용된 DTO 클래스를 만들어보았다.
ScheduleCreateRequestDto 클래스
@Getter
@AllArgsConstructor
public class ScheduleCreateRequestDto {

    @NotBlank(message = "유져 ID는 필수 입력값 입니다.")
    private final Long userId;

    @Size(max = 200, message = "일정 제목은 200자까지 작성할 수 있습니다.")
    @NotBlank(message = "일정 제목은 필수 입력값 입니다.")
    private final String todoTitle;

    @NotBlank(message = "일정 내용은 필수 입력값 입니다.")
    private final String todoContents;

    @NotBlank(message = "비밀번호는 필수 입력값 입니다.")
    private final String password;

}
ScheduleCreateRequestDto의 경우 Validation부분도 함께 작성하고자 한다. Validation 의존성 추가는 다음과 같다.
implementation 'org.springframework.boot:spring-boot-starter-validation'
ScheduleResponseDto 클래스
@Getter
@Setter
@AllArgsConstructor
public class ScheduleResponseDto {
    private Long id;
    private String name;
    private String todoTitle;
    private String todoContents;
    private LocalDateTime createdAt;
    private LocalDateTime modifiedAt;
}ScheduleResponseDto인데, 공통 에러처리와 공통응답을 한번에 해주고 싶어서 공통 응답 클래스 ApiResponseDto를 작성했다.
공통응답 처리를 위한 ApiResponseDto<T> 클래스
@Getter
@AllArgsConstructor
public class ApiResponseDto<T> {
    private int statusCode;
    private String message;
    private T data;
    private String errorDetails;

    public ApiResponseDto(int statusCode, String message, T data) {
        this.statusCode = statusCode;
        this.message = message;
        this.data = data;
    }

    public static <T> ApiResponseDto<T> OK(T data, String message) {
        return new ApiResponseDto<>(200, message, data);
    }

    public static <T> ApiResponseDto<T> OK(String message) {
        return new ApiResponseDto<>(200, message, null, null);
    }

    public static <T> ApiResponseDto<T> fail(ErrorCode errorCode) {
        return new ApiResponseDto<>(errorCode.getErrorCode(), errorCode.name(), null, errorCode.getErrorDetails());
    }
}
공통응답으로 상태코드와, 메세지, 출력할 데이터, 구체적인 에러 내용을 확인 할 수 있도록 필드를 구성했다.
2) user DTO 만들기
Api 명세서를 작성하면서 기본 유저작성 즉, 회원가입(POST)의 request와 response의 예시의 경우 다음과 같이 설계했다.

회원가입을 할때는 유저의 이름과 이메일, 그리고 비밀번호를 저장하는데, 설정한 비밀번호가 맞는지 확인하기 위해 비밀번호 확인까지 입력받는다.
회원가입시(POST) UserSignUpRequestDto 클래스
@Getter
@AllArgsConstructor
public class UserSignUpRequestDto {

    @NotBlank(message = "이름은 필수 입력값 입니다.")
    private final String name;

    // TODO: 정규표현식 알아보기
    @Email
    @NotBlank(message = "이메일은 필수 입력값 입니다.")
    private final String email;

    @NotBlank(message = "비밀번호는 필수 입력값 입니다.")
    private final String password;
    private final String passwordCheck;
}
출력할 UserResponseDto 클래스
@Getter
@Setter
@AllArgsConstructor
public class UserResponseDto{
    private Long id;
    private String name;
    private String email;
    private LocalDateTime createdAt;
    private LocalDateTime modifiedAt;
}
등록된 회원을 출력할 때, 회원의 비밀번호가 출력되지 않도록 responseDTO를 설정한다.
3. User 등록(회원가입) 구현(Create)
회원가입을 구현하기 위해서는 유저 정보를 받아서 DB에 저장하는 기능이 필요하다.
이때, 회원가입에 필요한 키는 이름, 이메일, 비밀번호, 비밀번호 확인이다. 비밀번호 확인의 경우, 비밀번호와 일치해야하기 때문에 이에 대한 예외를 던진다.
Controller
@Slf4j
@RestController
@RequestMapping("/users")
@RequiredArgsConstructor
public class UserController {

    private final UserService userService;

    @PostMapping("/sign-up")
    public ApiResponseDto<UserResponseDto> signUpUser(@RequestBody UserSignUpRequestDto dto) {
        UserResponseDto userResponseDto = userService.signUpUser(dto);
        return ApiResponseDto.OK(userResponseDto, "회원가입 성공");
    }
}
Service
@Service
@RequiredArgsConstructor
public class UserService {

    private final UserRepository userRepository;

    public UserResponseDto signUpUser(UserSignUpRequestDto dto) {
        if (!dto.getPassword().equals(dto.getPasswordCheck())) {
            throw new NoMatchPasswordConfirmation("회원가입 유저 비밀번호 확인 불일치");
        }

        Users user = new Users(dto);
        Users saveUser = userRepository.save(user);

        return new UserResponseDto(saveUser);
    }
}
Interface memberRepository(JPA사용)
public interface UserRepository extends JpaRepository<Users, Long> {
}
밀리초까지 출력되는 것을 알수 있는데 나는 밀리초를 제외해서 출력하고 싶었다.
그래서 다음 블로그를 참고했다. 어노테이션을 통해 포맷을 지정할 수 있는 것처럼 보인다.
[09] mutsa-SNS 4일차 - Post 조회 기능 추가
등록한 post를 조회하는 기능을 추가하였다. postId를 통해 1개의 글 조회 전체 Post 조회 1. Domain Post public class Post extends BaseEntity{ @Id @GeneratedValue(strategy = GenerationType.IDENTITY) private int id; private String bod
celdan.tistory.com
@JsonFormat(shape = JsonFormat.Shape.STRING, pattern = "yyyy-MM-dd HH:mm:ss", timezone = "Asia/Seoul")적용하고 싶은 필드에 형식을 지정하하는 어노테이션이다.
@Getter
@Setter
@AllArgsConstructor
public class UserResponseDto{
    private Long id;
    private String name;
    private String email;

    @JsonFormat(shape = JsonFormat.Shape.STRING, pattern = "yyyy-MM-dd HH:mm:ss", timezone = "Asia/Seoul")
    private LocalDateTime createdAt;

    @JsonFormat(shape = JsonFormat.Shape.STRING, pattern = "yyyy-MM-dd HH:mm:ss", timezone = "Asia/Seoul")
    private LocalDateTime modifiedAt;

    public UserResponseDto(Users user) {
        this.id = user.getId();
        this.name = user.getName();
        this.email = user.getEmail();
        this.createdAt = user.getCreatedAt();
        this.modifiedAt = user.getModifiedAt();
    }
}
그럼 이렇게 밀리초까지 저장된다하더라도

다음과 같이 format을 적용해둔 DateTime형태로 출력된다. 만약 밀리초가 필요하게 될때(같은 초에 실행되었다든지 하는…) 사용하기 위해서 일부러 밀리초 형태로 데이터베이스에 삽입하도록 했다.
4. User 전체 조회 구현(Read)
Controller
@GetMapping
public ApiResponseDto<List<UserResponseDto>> findAllUser() {
    List<UserResponseDto> userResponseDtoList = userService.findAllUser();
    return ApiResponseDto.OK(userResponseDtoList, "유저 전체 조회 성공");
}
Service
public List<UserResponseDto> findAllUser() {
    List<Users> allUsers = userRepository.findAll();
    return allUsers.stream().map(UserResponseDto::new).toList;
}
여기서 새로 도전해본 것은 List<Users>를 List<UserResponseDto>로 바꾸기 위해 stream().map()을 사용해봤다는 것이다.
튜터님의 지난과제 해설에서는 다음과 같은 코드가 등장했다.
return schedulePage.map(schedule -> {
    Member member = schedule.getMember();
    return new ScheduleResponseDto(
            schedule.getId(),
            schedule.getTask(),
            member.getName(),
            member.getEmail(),
            schedule.getCreatedAt(),
            schedule.getUpdatedAt()
    );
});
Stream으로 리스트안의 클래스 타입을 변환시켜주는 것이다. stream을 이해하고 연습하기 위해서 stream().map()을 사용했으며, 마지막으로 stream()형식을 .toList()를 이용하여 List형태로 변환해줘야 한다는 것 까지 알게되었다.
.map(UserResponseDto::new)로 바로 변환할 수 있었던 이유는 해당 클래스에 빠르게 매핑할 수 있는 생성자를 만들었기 때문에 가능했다.
// UserResponseDto에 오버로딩한 생성자

public UserResponseDto(Users user) {
    this.id = user.getId();
    this.name = user.getName();
    this.email = user.getEmail();
    this.createdAt = user.getCreatedAt();
    this.modifiedAt = user.getModifiedAt();
}
5. 단일 유저 조회 구현(Get)
단일 유저는 유저의 id값을 @PathVariable로 받아서 조회해볼 수 있다.
만약 조회할 id가 존재하지 않는다면 이에 대해 예외를 던지는 로직을 작성했다.
Controller
@GetMapping("/{userId}")
public ApiResponseDto<UserResponseDto> findUserById(@PathVariable Long userId) {
    UserResponseDto userResponseDto = userService.findUserById(userId);
    return ApiResponseDto.OK(userResponseDto, "id " + userId + " 유저 조회 성공");
}
Service
public UserResponseDto findUserById(Long id) {
    Users findUser = userRepository.findUsersByIdOrElseThrow(id);
    return new UserResponseDto(findUser);
}
Repository
Optional<Users> findUsersById(Long id);

default Users findUsersByIdOrElseThrow(Long id) {
    return findUsersById(id).orElseThrow(() ->
            new NotFoundUserId("찾을 수 없는 user id"));
}
6. 유저 이름 수정 구현(Patch)
유저 정보를 수정할 수 있는 코드를 작성하려다가 한가지 고민사항이 생겼다.
유저를 생성할 때, 유저 이름, 이메일, 비밀번호를 작성한다. 이메일은 유니크한 속성으로 사용되므로, 유저 이름과 비밀번호를 수정할 수 있는 코드를 작성하고 싶었다.
그런데 보통 생각해보면, 비밀번호는 기존비밀번호, 새비밀번호, 새비밀번호확인을 따로 받지, 이름과 함께 수정하진 않는다.
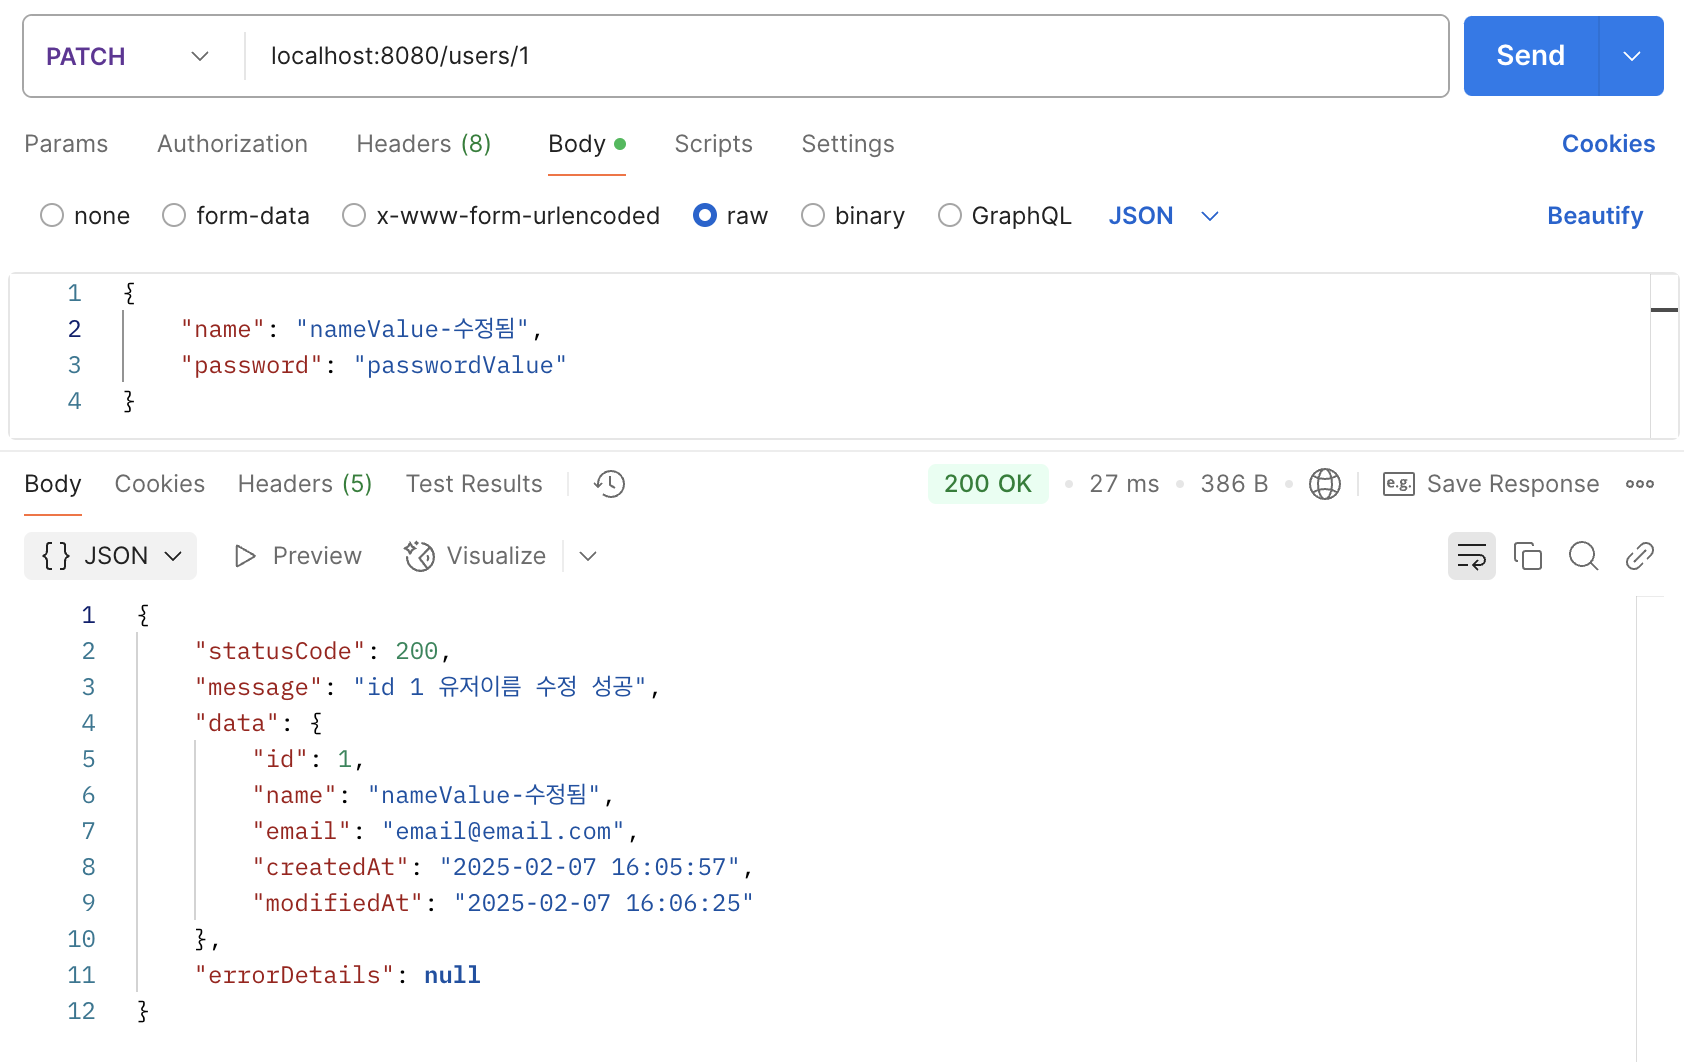
따라서, 유저 이름을 수정할 때는 유저 이름만 수정하도록 이름과 수정을 인증 받을 수 있는 비밀번호를 필드로 두는 DTO를 만들었고 이 형태로 요청을 받고자 했다.
만약 비밀번호가 입력된 기존의 비밀번호와 불일치 한다면 예외를 출력해주도록 로직을 구현했다.
Controller
@PatchMapping("/{userId}")
public ApiResponseDto<UserResponseDto> updateUsername(
        @PathVariable Long userId,
        @RequestBody UserUpdateNameRequestDto dto) {
    UserResponseDto userResponseDto = userService.updateUsername(userId, dto);
    return ApiResponseDto.OK(userResponseDto, "id " + userId + " 유저이름 수정 성공");
}
Service
@Transactional
public UserResponseDto updateUsername(Long id, UserUpdateNameRequestDto dto) {
    Users findUser = userRepository.findUsersByIdOrElseThrow(id);

    if (!findUser.getPassword().equals(dto.getPassword())) {
        throw new PasswordMismatchException("비밀번호 불일치");
    }

    findUser.updateUsers(dto.getName());  // setter를 사용하는 것만으로도 자동으로 업데이트 됨
    return findUserById(id);
}
7. 유저 비밀번호 수정기능 (patch)
앞서 언급한 것과 마찬가지로, 유저 비밀번호를 수정할 때는 기존 비밀번호, 새비밀번호, 새비밀번호확인을 입력받는다.
기존 비밀번호로 입력된 것이 데이터베이스에 입력된 비밀번호와 일치하는지, 앞서 이름을 수정했던 것처럼 똑같이 확인하고, 일치한다면 비밀번호를 업데이트 할 수 있도록 한다.
이때 응답해줄 데이터 값이 없으므로 Void형태로 반환한다.
Controller
@PatchMapping("/{userId}/password")
public ApiResponseDto<Void> updatePassword(
        @PathVariable Long userId,
        @RequestBody UserUpdatePasswordRequestDto dto) {
    userService.updatePassword(userId, dto);
    return ApiResponseDto.OK("id " + userId + " 비밀번호 수정 성공");
}
Service
@Transactional
public void updatePassword(Long id, UserUpdatePasswordRequestDto dto) {
    if (!dto.getNewPassword().equals(dto.getNewPasswordCheck())) {
        throw new NoMatchPasswordConfirmation("유저 비밀번호 확인 불일치");
    }

    Users findUser = userRepository.findUsersByIdOrElseThrow(id);

    if (!findUser.getPassword().equals(dto.getOldPassword())) {
        throw new PasswordMismatchException("기존 비밀번호와 불일치");
    }

    findUser.updatePassword(dto.getNewPassword());
}

실행 후 데이터베이스를 확인해보면 새로운 비밀번호가 입력됨을 확인할 수 있다.
8. User 삭제 기능(delete)
비밀번호를 받아 유저를 삭제하는 기능이다.
이때, 비밀번호만 받는데 Dto클래스가 따로 필요할지에 대해 생각해봤다. 그런식으로 설계하다가는 requestDto가 사용 메서드마다 늘어날 것이며, 오히려 복잡해질것이라는 생각이 들었다.
그래서 @RequsetBody어노테이션과 Map컬렉션을 사용하여 request를 받기로 했다.
Request.get(“password”)를 사용하면 password 키의 값을 가져올 수 있다.
또한 기존 비밀번호가 일치하는지 아닌지 확인해야하며, 일치하지 않을경우 예외를 던진다.
Controller
@PostMapping("/{userId}/delete")
public ApiResponseDto<Void> deleteUser(
        @PathVariable Long userId,
        @RequestBody Map<String,String> request) {
    userService.deleteUser(userId, request.get("password"));
    return ApiResponseDto.OK("id " + userId + " 회원 탈퇴");
}
Service
@Transactional
public void deleteUser(Long id, String password) {
    Users findUser = userRepository.findUsersByIdOrElseThrow(id);

    if (!findUser.getPassword().equals(password)) {
        throw new PasswordMismatchException("기존 비밀번호와 불일치");
    }
    userRepository.delete(findUser);
}
9. 일정 작성 기능(Post)
유저에 대해 CRUD를 작성했다면 이제 일정 CRUD를 작성할 수 있을 것 같다고 판단했다.
과제는 일정CRUD를 먼저 구현하라고 했지만, 그렇게되면 나중에 코드를 수정하기가 힘들어지기때문에 먼저 유저 CRUD를 작성했다.
일정에는 어느 유저가 작성했는지를 나타내는 userid, 어떤 일정제목, 내용을 작성했는지, 그리고 수정 삭제를 위한 비밀번호를 DTO로 설정하여 받는다.
입력받은userId로 유저를 가져오고, 그 유저를 set하는 방식으로 입력받은 일정을 저장할 수 있다.
Controller
@Slf4j
@RestController
@RequestMapping("/schedules")
@RequiredArgsConstructor
public class ScheduleController {

    private final ScheduleService scheduleService;

    @PostMapping
    public ApiResponseDto<ScheduleResponseDto> createSchedule(@RequestBody ScheduleCreateRequestDto dto) {
        ScheduleResponseDto scheduleResponseDto = scheduleService.createSchedule(dto);
        return ApiResponseDto.OK(scheduleResponseDto, "일정 작성 성공");
    }
}
Service
@Service
@RequiredArgsConstructor
public class ScheduleService {

    private final UserRepository userRepository;
    private final ScheduleRepository scheduleRepository;

    public ScheduleResponseDto createSchedule(ScheduleCreateRequestDto dto) {
        Users findUser = userRepository.findUsersByIdOrElseThrow(dto.getUserId());

        Schedules schedules = new Schedules(dto);
        schedules.setUsers(findUser);

        Schedules saveSchedule = scheduleRepository.save(schedules);

        return new ScheduleResponseDto(saveSchedule, findUser);
    }
}
ScheduleRepository
public interface ScheduleRepository extends JpaRepository<Schedules, Long> {

}
10. 일정 전체 조회 기능(Read)
전체일정을 조회할 수 있다. 이때 List<Schedules>를 List<ScheduleResponseDto>로 만들기 위해 stream()을 사용했다.
Controller
@GetMapping
public ApiResponseDto<List<ScheduleResponseDto>> findAllSchedule() {
    List<ScheduleResponseDto> scheduleResponseDtoList = scheduleService.findAllSchedule();
    return ApiResponseDto.OK(scheduleResponseDtoList, "일정 전체 조회 성공");
}
Service
public List<ScheduleResponseDto> findAllSchedule() {
    List<Schedules> allSchedule = scheduleRepository.findAll();
    return allSchedule.stream().map(ScheduleResponseDto::new).collect(Collectors.toList());
}

11. 단일 일정 조회 기능 (Read)
@PathVariable로 입력받은 일정의 id값으로 일정을 조회할 수 있다. 만약 존재하지 않는 일정 id라면 예외를 던진다.
Controller
@GetMapping("/{id}")
public ApiResponseDto<ScheduleResponseDto> findScheduleById(@PathVariable Long id) {
    ScheduleResponseDto scheduleResponseDto = scheduleService.findScheduleById(id);
    return ApiResponseDto.OK(scheduleResponseDto, "id " + id + " 일정 조회 성공");
}
Service
public ScheduleResponseDto findScheduleById(Long id) {
    Schedules findSchedule = scheduleRepository.findSchedulesByIdOrElseThrow(id);
    return new ScheduleResponseDto(findSchedule);
}
Repository
public interface ScheduleRepository extends JpaRepository<Schedules, Long> {

    Optional<Schedules> findSchedulesById(Long id);

    default Schedules findSchedulesByIdOrElseThrow(Long id) {
        return findSchedulesById(id).orElseThrow(() ->
                new NotFoundScheduleId("찾을 수 없는 일정"));
    }
}

12. 일정 제목 내용 수정(Update)
일정에는 제목과 내용이 들어간다. 따라서 일정 제목과 내용을 수정할 수 있다. 위에서 유저정보의 경우에는 이름과 비밀번호를 따로 메서드를 구현했다.
하지만 보통 게시글을 수정할때 제목따로, 내용따로 수정하는것이 아닌, 제목과 내용을 모두 수정하도록 되어있다.
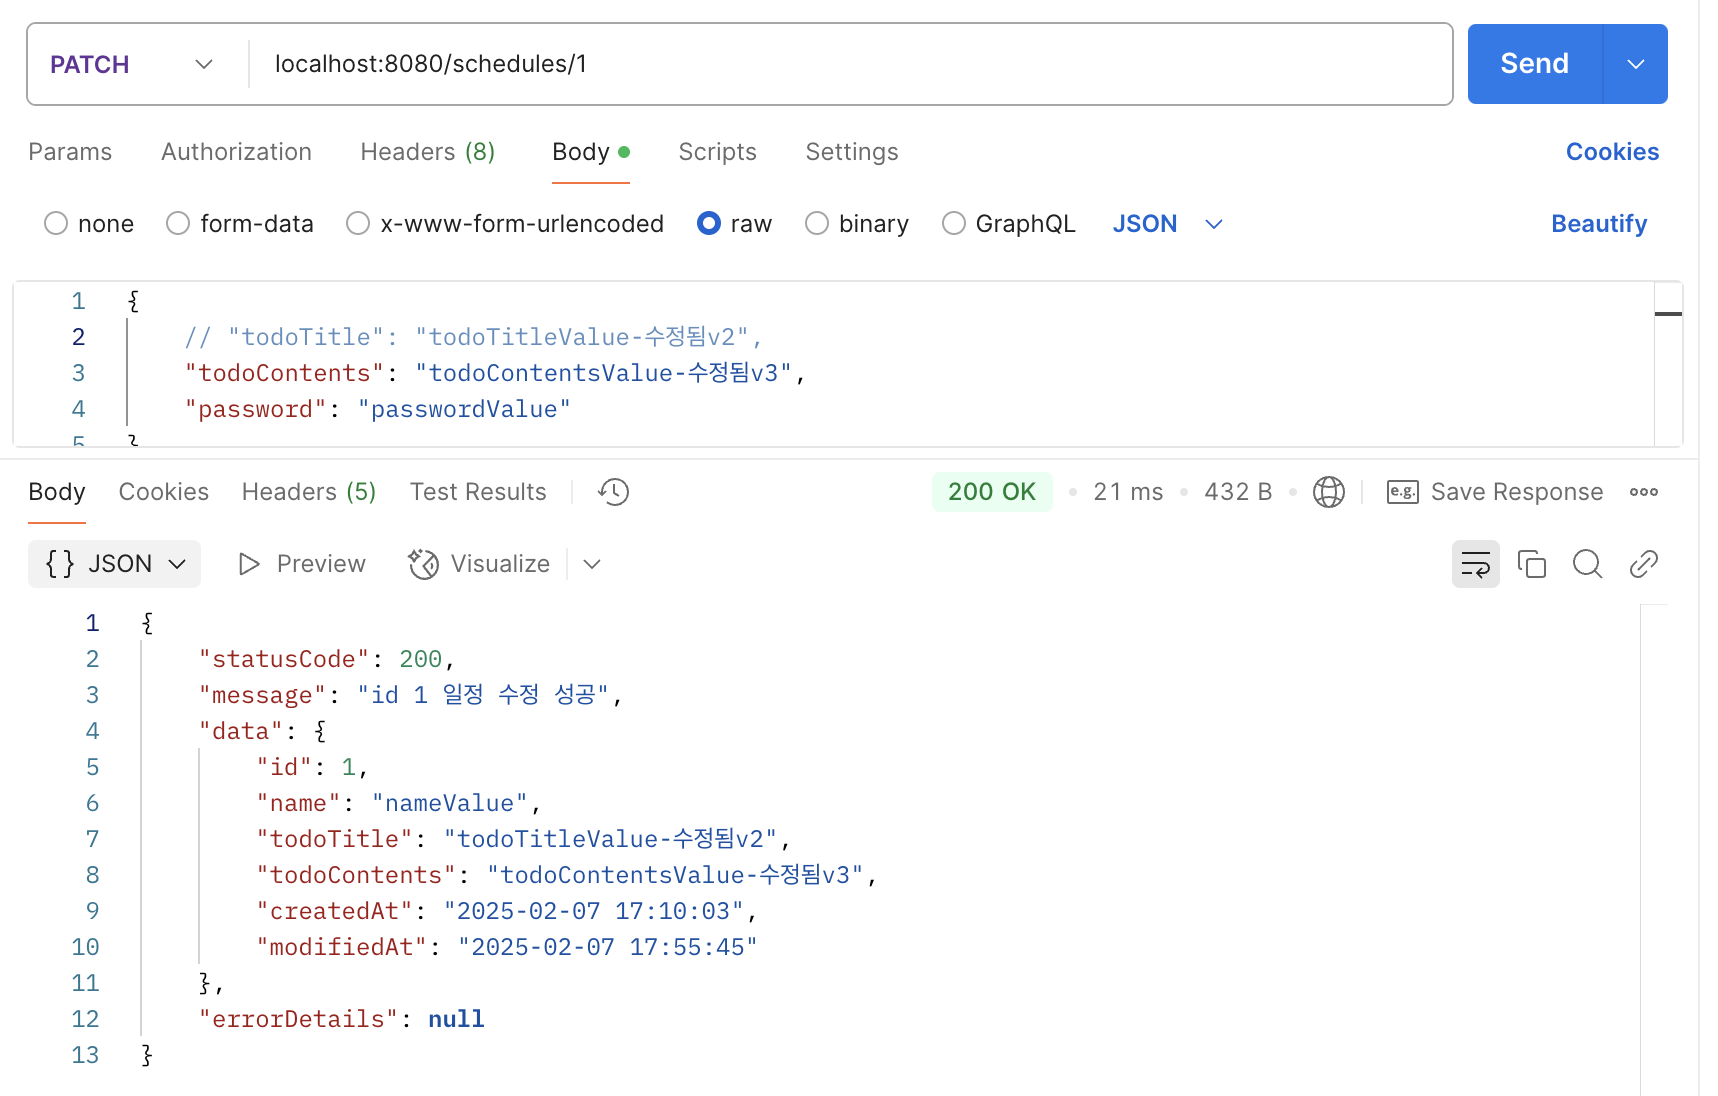
그래서 입력한 내용에 따라 제목, 내용 모두 또는 각각 수정될 수 있도록 로직을 작성하고 싶었다. 그래서 if 조건문을 사용하여 입력 되었을때를 구분하여 업데이트 하는 로직을 구현하였고, 둘다 입력 받지 못하면 예외를 던진다.
Controller
@PatchMapping("/{id}")
public ApiResponseDto<ScheduleResponseDto> updateSchedule(
        @PathVariable Long id,
        @RequestBody ScheduleUpdateRequestDto dto) {
    ScheduleResponseDto scheduleResponseDto = scheduleService.updateSchedule(id, dto);
    return ApiResponseDto.OK(scheduleResponseDto, "id " + id + " 일정 수정 성공");
}
Service
@Transactional
public ScheduleResponseDto updateSchedule(Long id, ScheduleUpdateRequestDto dto) {
if (dto.getTodoTitle() == null && dto.getTodoContents() == null) { // 일정 제목과 내용 모두 입력받지 못했을때
throw new InvalidScheduleUpdateRequestException("일정 제목, 내용 모두 받지 못함");
}
Schedules findSchedule = scheduleRepository.findSchedulesByIdOrElseThrow(id);
Users findScheduleUsers = findSchedule.getUsers();
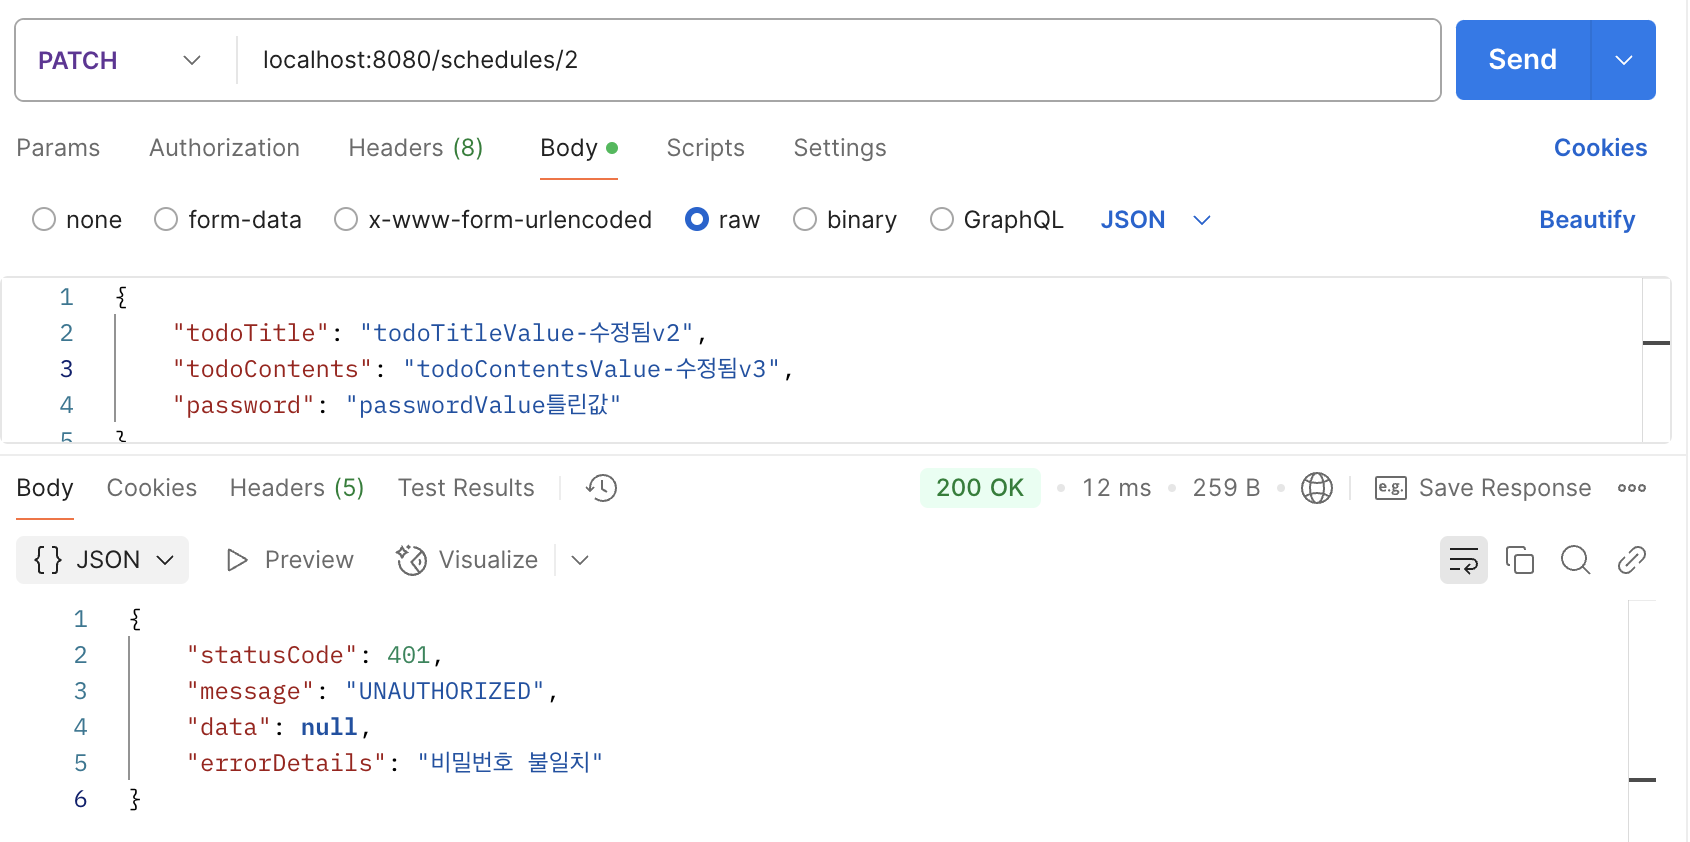
if (!findScheduleUsers.getPassword().equals(dto.getPassword())){
throw new PasswordMismatchException("비밀번호 불일치");
}
if (dto.getTodoTitle() != null) { // 일정제목이 입력되었을 때
findSchedule.updateTodoTitle(dto.getTodoTitle());
}
if (dto.getTodoContents() != null) { // 일정내용이 입력되었을 때
findSchedule.updateTodoContents(dto.getTodoContents());
}
return findScheduleById(id);
}

이 수정 메서드를 구현할 때 많은 예외가 등장한다.
수정시 일정 제목, 일정 내용 둘다 받지 못하면 던지는 InvalidScheduleUpdateRequestException,


일정 id값이 존재하지 않으면 출력되는 NotFoundScheduleId,


DB에 저장된 password가 아닌 다른 비밀번호가 입력되면 출력되는 PasswordMisMatchException이 그것이다.


이 예외 들은 나중에 ExceptionHandler로 예외처리를 할 예정이다.
13. 일정 삭제 기능 구현(Delete)
일정 삭제 기능도 유저 삭제 기능처럼 입력된 비밀번호를 받는다. 그래서 비밀번호가 일치하는지 일치하지 않는지를 확인해서 .deleteById(id)로 일정을 삭제한다.
Controller
@PostMapping("/{id}/delete")
public ApiResponseDto<Void> deleteSchedule(
        @PathVariable Long id,
        @RequestBody Map<String, String> request) {
    scheduleService.deleteSchedule(id, request.get("password"));
    return ApiResponseDto.OK("id " + id + " 일정 삭제");
}
Service
@Transactional
public void deleteSchedule(Long id, String password) {
    Users findUser = userRepository.findUsersByIdOrElseThrow(id);

    if (!findUser.getPassword().equals(password)) {
        throw new PasswordMismatchException("비밀번호 불일치");
    }
    scheduleRepository.deleteById(id);
}

14. 공통 예외 처리
유저와 일정 CRUD를 구현하면서 여러가지 예외가 발생할 수 있다. 이것을 전부 enum자료형 에러코드로 관리해주고 이를 통해 에러를 공통응답으로 출력하는 코드를 작성해줄것이다.
@Getter
@AllArgsConstructor
public enum ErrorCode {
    FAIL(500, "서버 내부 에러"),
    NO_MATCH_PASSWORD_CONFIRMATION(400, "유저 비밀번호 확인 불일치"),
    MISSING_REQUIRED_FIELD(400, "필요한 필드를 받지 못함"),
    UNAUTHORIZED(401, "비밀번호 불일치"),
    NOT_FOUND_ID(404, "존재하지 않는 id값");

    private final int errorCode;
    private final String errorDetails;
}
@Hidden
@RestControllerAdvice
@Slf4j
public class GlobalExceptionHandler {
@ExceptionHandler(NoMatchPasswordConfirmation.class)
protected ApiResponseDto<String> noMatchPasswordConfirmationHandler(NoMatchPasswordConfirmation ex) {
log.error("예외 발생 = {}", ex.getMessage());
return ApiResponseDto.fail(ErrorCode.NO_MATCH_PASSWORD_CONFIRMATION);
}
@ExceptionHandler(InvalidScheduleUpdateRequestException.class)
protected ApiResponseDto<String> invalidScheduleUpdateRequestException(InvalidScheduleUpdateRequestException ex) {
log.error("예외 발생 = {}", ex.getMessage());
return ApiResponseDto.fail(ErrorCode.MISSING_REQUIRED_FIELD);
}
@ExceptionHandler({NotFoundScheduleId.class, NotFoundUserId.class})
protected ApiResponseDto<String> idNotFoundExceptionHandler(RuntimeException ex) {
log.error("예외 발생 = {}", ex.getMessage());
return ApiResponseDto.fail(ErrorCode.NOT_FOUND_ID);
}
@ExceptionHandler(PasswordMismatchException.class)
protected ApiResponseDto<String> passwordMismatchExceptionHandler(PasswordMismatchException ex) {
log.error("예외 발생 = {}", ex.getMessage());
return ApiResponseDto.fail(ErrorCode.UNAUTHORIZED);
}
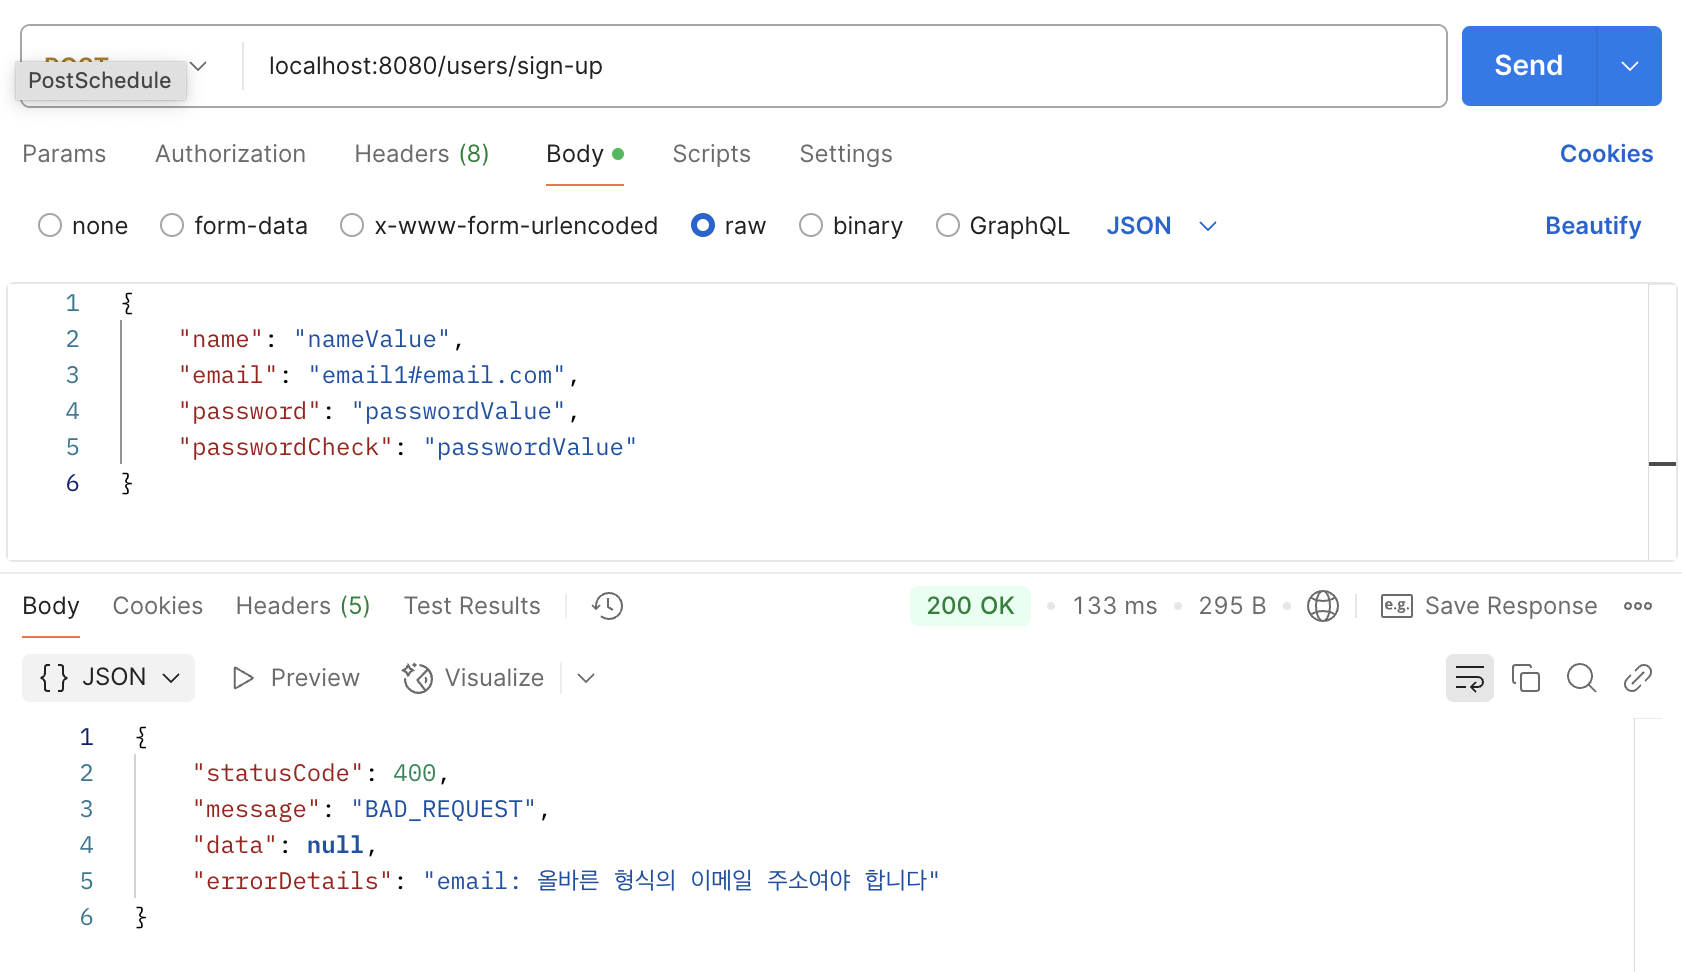
@ExceptionHandler(MethodArgumentNotValidException.class)
public ApiResponseDto<String> handleValidationExceptionHandler(MethodArgumentNotValidException ex) {
String errorMessage = ex.getBindingResult()
.getFieldErrors()
.stream()
.map(error -> error.getField() + ": " + error.getDefaultMessage())
.findFirst()
.orElse("입력값이 올바르지 않습니다.");
return new ApiResponseDto<>(400, "BAD_REQUEST", null, errorMessage);
}
@ExceptionHandler(Exception.class)
protected ApiResponseDto<String> handleGeneralException(Exception ex) {
log.error("예외 발생 = {}", ex.getMessage());
return ApiResponseDto.fail(ErrorCode.FAIL);
}
}이 코드를 통해 각 에러가 발생했을때 발생하는 에러를 공통응답으로 출력해줄 수있다.


보통 개발자가 에외를 감지하고 예외를 처리한 것은 이렇게 공통응답으로 처리하지만
아래와 같이 개발자가 인지하지 못한 예외에 대해서도 하나씩 예외를 처리해야한다. 그래서 지금까지 발견된 예외인
여러가지 에러클래스와 함께 enum으로 관리하는 방법, 여러개의 에러를 출력할 수 있도록 하기, 중복된 이메일 키 관련, 해당되지 않는 Method url 조합에 대한 에러도 처리하기도 과제로 남겨두고 다음 구현을 진행해 보겠다.

15. Request에 대한 Validation지정하기
validation을 지정하는 것은 어렵지 않다. 다만, 정규표현식을 사용한 이메일형식에 대해 유효성검사를 하는 것도 알아보고 싶었다.
@NotBlank(message = "이름은 필수 입력값 입니다.")
@Size(max = 8, message = "유저 이름은 8자까지 작성할 수 있습니다.")
private final String name;

@Pattern(regexp = "^[\\w!#$%&'*+/=?`{|}~^.-]+@[\\w.-]+\\.[a-zA-Z]{2,6}$",
        message = "이메일 형식이 올바르지 않습니다.")
@NotBlank(message = "이메일은 필수 입력값 입니다.")
private final String email;
이메일 관련 유효성 검사 어노테이션에는 @Email도 있다. 하지만, @Email은 @가 있는지 없는지만 판단하는 걸로 알고 있다.
따라서 . 등 여러 조건을 확인하고 싶으므로 이메일 정규표현식을 사용했다.
16. PasswordEncoder
비밀번호와 같은 민감한 정보를 문자그대로 저장하면 보안에 취약점이 생길 수 있다. 따라서, 비밀번호를 보안을 적용한 예측할 수 없는 문자로 저장해주는 것이 필요하다.
이를 적용하기 위해 PasswordEncoder를 사용하여 비밀번호를 인코딩 또는 매치시켜보도록 하겠다.
이 메서드는 객체 호출 단계 없이 바로 사용하고 싶었기 때문에, static메서드로 구현하여 사용했다.
의존성 추가
implementation 'at.favre.lib:bcrypt:0.10.2'
@Component
public class PasswordEncoder {

    public static String encode(String rawPassword) {
        return BCrypt.withDefaults().hashToString(BCrypt.MIN_COST, rawPassword.toCharArray());
    }

    public static boolean matches(String rawPassword, String encodedPassword) {
        BCrypt.Result result = BCrypt.verifyer().verify(rawPassword.toCharArray(), encodedPassword);
        return result.verified;
    }
}
유저를 저장할 때 encode()메서드를 사용하면 설정된 인코딩 방식에따라 예측불가능한 문자열이 password로 저장이 된다.
17. @NotBlack와 @NotNull의 차이(트러블 슈팅)
jakarta.validation.UnexpectedTypeException: HV000030: No validator could be found for constraint 'jakarta.validation.constraints.NotBlank' validating type 'java.lang.Long'. Check configuration for 'userId'다음과 같은 에러를 마주했다. 내용은 NotBlank 관련 유효성검사가 제대로 실행되지 않는다는 것 같았다.


이 에러는 다음과 같은 상황에 등장했다.
userId 필드에 @NotBlank 어노테이션을 작성한 것이다.
@NotBlank와 @NotNull은 다음과 같은 차이점이 있다.
| @NotBlack | 문자열(String)값이 공백인지 아닌지 확인 —> Long과 같은 숫자 타입은 사용할 수 없음 |
| @NotNull | 문자 또는 숫자 등의 타입에 대해 null인지 아닌지 확인 |
따라서 userId 필드에는 @NotBlack가 아닌, @NotNull을 사용해야한다.


